At some point, every roof will reach the end of its life. Whether it’s due to long-term weathering, storm damage, or simply age, replacing your roof is an essential investment in your home’s safety and structural integrity.
While a full roof replacement can be daunting, understanding the process can make things far more manageable.
A clear overview of each step involved helps set expectations and minimises disruption. With the right roofing company by your side, the process can be smooth, efficient, and even quite straightforward.
In this post, Acorn Roofing will walk you through what typically happens from the moment you notice a problem to the completion of your brand-new roof.
Initial Roof Inspection and Assessment
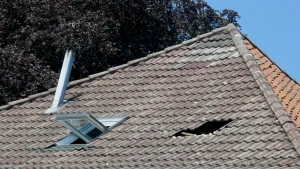
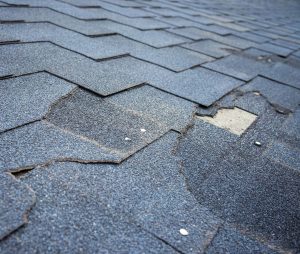
The first stage is to book a professional roof inspection. An experienced roofer will assess the condition of your existing roof, checking for visible damage, leaks, sagging areas, missing tiles, and any structural issues.
This thorough assessment helps determine whether a full replacement is necessary or if a repair will suffice.
You should receive a detailed quote outlining the scope of work, materials required, estimated timescales, and total cost. It’s worth getting a couple of quotes from reputable roofers to compare.
Look for tradesmen who are transparent, insured, and happy to answer questions—this is a major home improvement job, so peace of mind is vital.
Choosing the Right Roofing Material
Once it’s decided that a replacement is needed, the next step involves choosing the most suitable roofing material.
In the UK, options typically include clay tiles, concrete tiles, natural slate, or more modern flat roofing solutions like EPDM or GRP for certain properties. Each has its benefits in terms of durability, appearance, and cost.
Consideration should also be given to your local climate, especially in places like Blackpool, where coastal weather can be harsh.
Your roofer can offer guidance based on experience with similar properties in the area. Think about long-term performance, maintenance, and the visual impact on your home’s kerb appeal.
Getting the Necessary Permits (If Required)
Most roof replacements don’t require planning permission, especially if you’re replacing the existing materials with something similar.
However, exceptions exist, particularly if your home is a listed building or located in a conservation area. In such cases, consent from the local authority may be needed.
A good roofing contractor will be able to advise you on whether any approvals are necessary and can often assist with the process. It’s always better to check beforehand than to risk a fine or having to undo work.
For most standard homes, building regulations approval may still be required, especially if you’re replacing structural timbers or significantly changing the roofline.
Preparing Your Property for the Work
Before any work begins, it’s important to make preparations around your property. You’ll need to ensure there’s clear access to the roof, move vehicles from the driveway, and remove any fragile garden items.
If you store anything valuable in your loft, it’s also worth covering or relocating it to protect from dust and debris.
The roofing team will typically erect scaffolding for safety and ease of access. Expect a bit of noise and disruption while the work is ongoing, and consider letting neighbours know in advance.
Most reputable roofers work efficiently and keep disruption to a minimum, but a little preparation goes a long way to making the process as smooth as possible.
Stripping the Old Roof
The first major task is removing the old roof covering. This involves carefully stripping back the existing tiles or slates, underlay, and battens to expose the structure beneath.
The waste materials will usually be placed into a skip on-site and disposed of responsibly, with many roofers now recycling suitable materials.
This part of the job is typically completed fairly quickly, depending on the size and pitch of the roof. It’s also an important stage where hidden problems, such as rotten timbers or weakened joists—may become visible.
Any unexpected issues will be addressed before moving forward to ensure your new roof has a solid foundation.
Inspecting and Repairing the Roof Structure
With the old roof removed, your roofer will inspect the supporting structure for signs of damage or wear. This includes rafters, joists, and roof decking.
Any parts that are rotten, warped or otherwise compromised will need to be replaced or reinforced to provide a secure base for the new covering.
Structural integrity is key to a long-lasting roof, so this part must be done thoroughly. If repairs are required, your roofer will inform you of the work needed and any extra costs involved.
Once the frame is sound, they’ll proceed to install the underlay and battens as the first steps in re-covering the roof.
Installing the New Roof
With the framework prepped, the team will begin fitting the new roof. This usually starts with laying a breathable membrane or underlay to provide extra weatherproofing.
Timber battens are then fixed in place to support the new tiles or slates, which are methodically laid and secured across the roof.
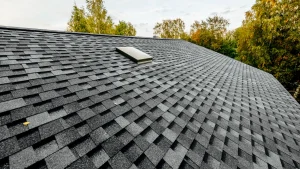
Additional elements such as ridge tiles, flashing around chimneys, and ventilation points will also be installed at this stage. This part of the job requires precision and attention to detail, ensuring everything is watertight and neatly finished.
A well-installed roof not only performs better but also greatly enhances the appearance of your home.
Guttering, Fascias and Soffits (if applicable)
Many homeowners choose to replace old guttering, fascias, and soffits while having a new roof installed. These components play a key role in directing water away from the roof and protecting the eaves from moisture damage.
New uPVC fascias and soffits can also give your home a fresh, modern look.
Replacing them during roof works is often more cost-effective, as the scaffolding is already in place. Your roofer can advise if they need updating, and doing so can prevent further issues like water ingress or rot.
Properly installed fascias and gutters also improve ventilation and reduce long-term maintenance.

Final Inspection and Clean-Up
Once installation is complete, the roofer will carry out a full inspection of the finished roof. They’ll ensure that all tiles or slates are correctly aligned and secured, all joints are sealed, and drainage is functioning properly.
Any minor adjustments will be made to guarantee your roof is ready to withstand the elements.
A professional roofer will also leave your property tidy, removing any leftover materials, dismantling scaffolding, and clearing debris from the garden or drive.
You should be provided with documentation covering the work done, warranties on materials, and any guarantees offered on labour.
Aftercare and Maintenance Tips
Even the best roof needs occasional upkeep to ensure it stays in top condition. It’s advisable to have your roof inspected every couple of years, especially after harsh winters or storms.
Keeping gutters clear and removing moss build-up can prevent water pooling and premature wear.
Your roofer may also provide guidance on how to spot early warning signs of problems, such as cracked tiles or sagging areas.
Regular maintenance not only extends the life of your roof but also helps avoid the need for costly repairs down the line. Treat it as an investment worth looking after.
Conclusion
A roof replacement might seem like a major undertaking, but with the right team and clear expectations, it can be a seamless process.
Understanding each stage—from inspection and material choice to installation and aftercare—can help you feel more confident and in control.
Whether your current roof is leaking, ageing, or simply needs upgrading, it’s worth speaking to a trusted local roofer.
Not only will a new roof protect your home, but it will also add value and peace of mind for years to come.